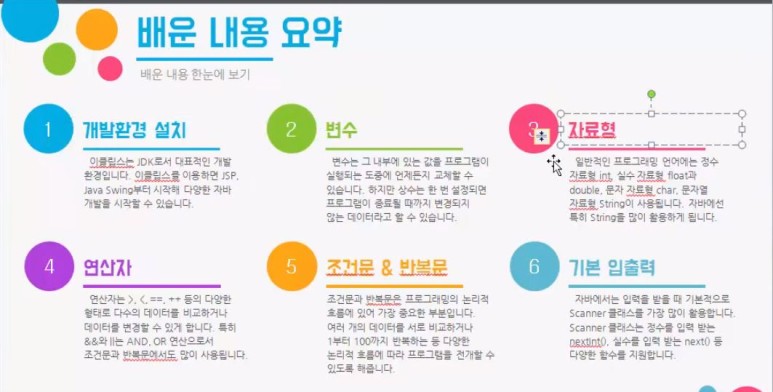
자바 기본문법
******************** 자바기초프로그래밍 강좌1강 - Hello World!
1.자바 기초 프로그래밍
: 국내의 대부분 통합 프로젝트가 자바로 구현이 되고 있을 만큼
자바는 현재 주력 언어로써 부상하게 되었습니다.
특히 웹에서는 JSP, 모바일에서는 안드로이드가
아주 높은 점유율을 가지고 있다는 점을 생각해보면
자바는 현재 사용되는 대부분의 시스템 개발의
기본이 되는 프로그래밍 언어라고 할 수 있는 것입니다.
자바는 동일한 프로그램이 운영채제를 가리지
않고 실행이 되는 특징이 있으며 C++과 같이 대표적인
객체 지향 프로그래밍 언어입니다.
2.자바 설치 과정
1) 구글 -> jdk 검색 후 OS환경에 맞게 설치
2) 환경변수 셋팅
: JDK설치 폴더 경로 복사
-> C:\Program Files\Java\jdk1.8.0_241\bin
: 시스템->고급-> 환경변수
-> 시스템변수중 Path더블클릭 -> 새로만들기-> Path에 경로 추가
: 시스템변수 -> 새로만들기
-> 변수이름:JAVA_HOME,변수값 복사한 경로 -> 확인 추가
:cmd 창에 javac 입력 후 설치 확인
3) 이클립스 설치
4) 뉴프로젝트->뉴클래스->헬로월드 프린트-> 런!
********************자바기초프로그래밍 강좌2강 - 변수(Variable)
1.변수(Variable) , 상수(Constants)
:변수 = 변할수있는 수 = 열린상자
:상수 = 고정적인 수 = 닫힌상자
2.final 키워드를 활용해 상수를 정의하고 이를 사용
※ 자바에서는 변수 초기화를 하지 않으면 사용할 수 없다.
public class Main {
//상수 선언
//final static double PI = 3.141592;
//final static int INT_MAX = 2147483647;//인트형 최대값
public static void main(String[] args) {
int a = 1;
int b = 2;
System.out.println("a + b = " + (a+b));
System.out.println("a - b = " + (a-b));
System.out.println("a * b = " + (a*b));
System.out.println("a / b = " + (a/b));
/*
int a = INT_MAX;
System.out.println(a);
/*
int r = 30;
System.out.println(r * r * PI);
내부 상수 선언
int intType = 100;
double doubleType = 150.5;
String stringType = "asdf";
System.out.println(intType);
System.out.println(doubleType);
System.out.println(stringType);
*/
}
}
※ Tip 자바에서는 변수 초기화를 하지 않으면 사용할 수 없다.
1.정수를 나타내는 타입만 해도 short,int, long으로 다양
2.정수 변수 안에 실수를 넣으면 정수 부분만 변수에 저장됨
3.실수 값을 반올림할 때는 변수에 0.5를 더한 뒤에
정수형으로 형변환을 하면 됨
4.반올림한 ㄱ밧 = (int)(실수+0.5);
double b = 0.9 ;
int a = (int)(b+0.2);
System.out.println(a);
********************자바기초프로그래밍 강좌3강 - 자료형(DataType)
1.자료형 - 나에게 필요한 데이터 타입
: 자바에서는 다른 프로그래밍 언어에서 사용하는 것과
거의 동일한 자료형이 존재한다.
마찬가지로 다양한 자료형이 존재하며 C언어와 두드러지는
차이점은 boolean형과 string형 정도만
있을 뿐이다. 이중에서 가장 많이 사용되는
자료형은 string, Array, boolean, char, int, doubli이다.
자료형 자체는 굳이 암기할 필요가 없고
프로그래밍을 통해 많은 훈련을 거치게 되면 알아서 잘 활용할
수 있게 됨. 또한 문자열을 나타내는
자료형인 string형이 아주 편리하게, 사용되며 string내부적으로
substring등의 함수를 제공하기 때문에 활용도가 높다.
2.자료형 - 데이터 타입
: Variables Data Types - integer
- Character
- Float
- Double
: double형을 이용하여 평균을 구함
: 아스키코드 기반의 char형을 사용해 a부터 z까지 출력 가능
: 10진수를 8진수 혹은 16진수로 바꾸어 출력
: String의 substring 함수를 활용
public class Main {
public static void main(String[] args) {
/*
//문자 자르기
String name = 'John doe';
System.out.println(name);
System.out.println(name.substring(0,1));
*/
/*
//진수로 변환
int a = 200;
System.out.println('10진수 : ' + a);
System.out.format(8진수 : %o \n, a);
System. out.format('16진수 : %x', a);
/*
//루프문
for(char i = 'a'; i<= 'z'; i++)
{
System. out.println(i+'');
}
*/
/*
//평균 구하기
double a =10.3;
double b = 9.6;
double c = 10.1;
System. out.println((a+b+c)/3);
*/
}
}
3.기본적으로 정수를 나타내는 자료형이 많은 이유는
각 자료형이 차지하는 메모리 공간의 크기가 다르기 때문
4.double 형이라고 하더라도 과도하게 큰 수를 저장하고자 하면
잘못된 계산 결과가 나온다.
5.소수점 표기 형식을 지수 형식으로
출력하고 싶으면 %e를 이용하면 됨
6.자바에서 string은 내부적으로 char의 배열로 됨
자바에서 string의 최대크기는 4기가바이트(몇억글자)
7.자바에서 string은 클래스 기반의 비원시적인 자료형임
********************자바기초프로그래밍 강좌4강 - 연산자(Operator)
1.연산자
: 연산사는 하나으 ㅣ기호 쳬계입니다. 흔히 1+2에서
1과 2는 피연산자(Oerand)이고 +는 연산자라고 합니다.
프로그래밍에서 연산자란 없어서는 안 될 만큼
아주 중요하며 계산에 있어서 가장 기초적인 부분이다.
프로그래밍에서 가장 많이 사용되는 연산자는
+ , - , * , / , % 이다.
추가적으로 ++와 ! 등과 같이 다양한 연산자가 사용되는
경우가 있기 때문에 이를 정확히 숙지하자!
: + = To add two number = i=3+2 = 5
- = For subtraction = i=3-2 = 1
* = For multiplication = i=3*2 = 6
/ = For division = i=3/2 = 1 : 나누고 남은건 버림
% = Modular division = i=10%3 = 1 : 나머지가 결과값
2.연산자 실습
: 초를 입력 받아 몇 분 몇 초인지 계산함
: ++와 --연산의 개념을 바르게 이해함
: %연산자와 사용법을 숙지
: ==, > , < , || , ! 연산의 개념을 바르게 이해함
: 조건? 참 : 거짓 연산의 형태를 숙지
: pow()를 이용한 거듭제곱 연산
public class Main {
final static int SECOND = 1000;
public static void main(String[] args) {
int i = 20;
i = i + 1;
i += 1;
System. out.println((100<i) || (i < 200));
//거듭제곱
double a = Math.pow(3.0,20.0);
System. out.println("3의 20제곱은 " + (int)a + "입니다.");
/*함수 사용
int x = 50;
int y = 60;
System. out.println("최대값은" + max(x,y) + "입니다" );
*/
/*
//논리/비교 연산자
int a = 50 ;
int b = 50 ;
System. out.println("a와b가 같은가요?" + ( a == b) );
System. out.println("a와b가 큰가요?" + ( a > b ) );
System. out.println("a와b가 작은가요?" + ( a < b ) );
System. out.println("a와b가 같으면서 a가 30보다 큰가요?" +((a == b) && (a < b)) );
System. out.println("a가 50이 아닌가요?" + !(a == b) );
*/
/*
//% 이해
System. out.println(1 % 3);
System. out.println(2 % 3);
System. out.println(3 % 3);
System. out.println(4 % 3);
System. out.println(5 % 3);
System. out.println(6 % 3);
*/
/*
//증감 연산자
int a = 10;
System. out.println("현재는 a는" + a + "입니다.");
a++;
System. out.println("현재는 a는" + a + "입니다.");
System. out.println("현재는 a는" + ++a + "입니다.");
System. out.println("현재는 a는" + a++ + "입니다.");
System. out.println("현재는 a는" + a + "입니다.");
*/
/*
//초 - > 분초로 바꿈
int minute = SECOND / 60; //나눈 값
int second = SECOND % 60; //나눈 나머지
System. out.println(minute + "분" + second + "초");
*/
}
//함수 생성 : 반환형, 함수 이름, 매개변수
//조건식?
static int max(int a, int b) {
int result = (a > b) ? a : b; //참이면 a 거짓이면 b를 반환함
return result;
}
}
※ : i++와 ++i 단순히 값을 증가시키려는 목적이라면 그 기능이 동일
: 100 < x < 200 은 잘못된 표현이다.
(100 < x) && (x < 200)로 표현하는것이 올바름
: i++는 i += 1과 동일한 표현
또한 i = i + 1과도 동일한 표현
(1만큰 증가)
********************자바기초프로그래밍 강좌5,6강 - 조건문 & 반복문1,2
1. 조건문
: 조건문과 반복문은 프로그래밍에 있어서 논리의 흐름을 정하는
가장 기본적인 기술이다.
조건문은 쉽게 말해 조건에 따라 결정을 내리는 것을 말함.
학점을 결정할 때 90점 이상이면 A++이라고 하는 것도 조건문 해당.
반복문은 반복적으로 같은 처리를 되풀이하는 것을 말함.
예를 들어 100명의 학생이 있을때 학생 각각의 학점을 출력하려고
한다면 100명의 학점 출력 코드를 모두 작성하는 것을 비효율적.
따라서 반복문을 이용하여 그러한 과정을 대신할 수 있는것.
조건문과 반복문의 문법을 처음에는 복잡해 보이지만 익숙하면 땡!
2. 실습
- if문을 이용하여 문자열이 특정 문자열을 포함하는 확인.
public class Main {
public static void main(String[] args) {
String a= "I Love You.";
if (a.contains("Love")) //contains : a.변수가 Love 포함하느냐 검색하는거
{
//포함하면 이부분 실행
System. out.println("Me Too");
}
else
{
//포함하지 않은 경우 실행
System. out.println("I Hate You");
}
}
}
- 점수에 따라서 다른 메세지 출력함.
public class Main {
public static void main(String[] args) {
int score = 95;
if (score >= 90)
{
System. out.println("A++입니다.");
}
else if (score >= 80)
{
System. out.println("B++입니다.");
}
else if (score >= 70)
{
System. out.println("C++입니다.");
}
else
{
System. out.println("F++입니다.");
}
}
}
- 문자열과 정수형을 각각 조건문을 이용해 활용해 차이점 확인.
public class Main {
public static void main(String[] args) {
String a = "Man";
int b = 0;
//자바는 String을 비교할 때 equals()을 이용한다.
//그 이유는 String은 다른 자료형과 다른 문자열 자료형이기 때문
if (a.equals("Man"))
{
System. out.println("남자입니다.");
}
else
{
System. out.println("남자가 아닙니다.");
}
if (b == 3)
{
System. out.println("3입니다.");
}
else
{
System. out.println("3아닙니다.");
}
if (a.equalsIgnoreCase("man") && b == 0) //equalsIgnoreCase 대소문자 무시하고 같은지 판단한다.
{
System. out.println("참");
}
else
{
System. out.println("거짓");
}
}
}
- while을 이용하여 1부터 1000까지의 합을 출력함.
public class Main {
public static void main(String[] args) {
int i = 1, sum = 0;
while (i <= 1000)
{
sum += i++;
}
System. out.println("1부터 1000까지의 합은 "+sum + "입니다");
}
}
- for문을 이용하여 삼각형을 출력.
public class Main {
final static int N = 30;
public static void main(String[] args) {
//for문 : 초기화부분, 조건부분, 연산부분
for (int i = N; i > 0; i--)
{
//2중 for문 , 중첩문
for (int j = i; j > 0; j--)
{
System. out.print("*");
}
System. out.println();
}
}
}
- for문을 이용하여 원을 출력.
public class Main {
final static int N = 15;
public static void main(String[] args) {
//원의 방정식 : x^2 + y^2 = r^2
for (int i = -N; i <= N; i++) //-15부터 1씩 증가하랏!
{
for (int j = -N; j<= N; j++)
{
if (i * i + j * j <= N * N)
{
System. out.print("*");
}
else
{
System. out.print(" ");
}
}
System. out.println();
}
}
}
3.정리
- 하나의 비교 연산자는 true 혹은 false를 반환하게 됨
- 모든 조건문, 반복문에서 왠만해서 무조건 괄호를 적용
- for문 혹은while문은 얼마든지 중첩
-for(;;)는 while(true)와 똑같이 무한루프라는 의미로 동작
-break;를 이용하여 반복문을 즉시 빠져나올 수 있음
//무한루프 후 break;
int count = 0;
for(;;)
{
System. out.println("출력"+count);
count++;
if (count == 10)
{
break;
}
}
********************자바기초프로그래밍 강좌7강 - 기본 입출력
1.기본 입출력
: 자바에서는 대표적으로 Scanner 클래스를 이용하여 사용자와
상호작용할 수 있다.
일반적으로 Scanner sc = new Scanner(System.in); 으로
클래스 객체를 생성한 뒤에 sc.nextlnt(); 와 같은 방법으로
int형을 입력받을 수 있습니다. 입력받은 자료는 내부적으로
어떠한 처리를 한 뒤에 다시 사용자에게 그 값을 반환한다.
프로그램이 입출력을 잘 지원한다는 것은 사용자 인터페이스가
뛰어나다는 의미와 같다.나중에 GUI를 배우게 되면
이러한 입출력을 훨씬 용이하게 할수있다.
2. 실습 - Scanner클래스를 이용
- 특정한 정수를 입력 받아서 그대로 출력한다.
import java.util.Scanner;
public class Main {
public static void main(String[] args) {
/*
//값 입력 받기
Scanner sc = new Scanner(System.in);
System. out.print("정수를 입력하세요 : ");
int i = sc.nextInt();
System. out.println("입력된 정수는 " + i + "입니다.");
sc.close();
*/
}
}
- 파일에 차례로 입력된 모든 정수에 100을 곱해 출력한다.
import java.io.File;
import java.io.FileNotFoundException;
import java.util.Scanner;
public class Main {
public static void main(String[] args) {
//파일 읽어오기
File file = new File("input.txt");
try {
Scanner sc = new Scanner(file);
while (sc.hasNextInt()) //읽어오는 파일에서 다음으로 읽을 정수가 있는지
{
//다음정수에 100을 곱한다.
System. out.println(sc.nextInt() * 100);
}
sc.close();
} catch (FileNotFoundException e) {
// TODO Auto-generated catch block
//e.printStackTrace();
System. out.println("파일을 읽어오는데 오류가 발생했다.");
}
//파일 생성방법 : 해당 프로젝트 마우스 오른쪽->file
//-> 창에 띄어쓰기 또는 줄바꿈으로 데이터 입력하고 생성
/*
//값 입력 받기
Scanner sc = new Scanner(System.in);
System. out.print("정수를 입력하세요 : ");
int i = sc.nextInt();
System. out.println("입력된 정수는 " + i + "입니다.");
sc.close();
*/
}
}
※ 라이브러리 import 방법
: 빨간줄 마우스 올려놓고 힌트안에 import 클릭
: 예외처리도 해당 빨간줄 오류 마우스 올려놓고 힌트속에
try/catch 선택 하면 자동 코딩됨
********************자바기초프로그래밍 강좌8강 - 복습
1.복습
: 자바에서는 Scanner 클래스만 잘 활용해도 다양한 입출력
형태를 자유자재로 구사할 수 있습니다.
: 주석은 일단 최대한 많이 작성하는 습관들이자!
주석은 컴파일단계에서 제거되기에 프로그램 상관무!
: Scanner로 문자열을 입력 받고 싶을 때에는 next()함수와
nextLine()을 적절히 사용함!
********************자바기초프로그래밍 강좌9강 - 사용자 정의 함수
1.객체지향의 꽃 자바 - 자바 객체 지향 프로그래밍을 공부한다.
: 먼저 사용자 정의 함수와 배열에 대해서 배운 뒤에 이어서 자바의
객체 지향 프로그래밍에 대해서 공부하게 될것.
객체 지향 프로그래밍에 익숙할 때 손쉽게 다양한 프로그램밍을
할 수 있다. 이때도 객체지향 프로그래밍의 장점을 살린 MVC모델을
이용한 구축이 이루어집니다. 무엇보다 현실세계의 다양한 사물을
컴퓨터 내부의 언어로 표현하고 그것을 활용할 수 있다는 점에서
자바 객체지향 프로그래밍은 아주 활용도가 높은 프로그래밍
기법이다.
2.객체지향
: 객체는 일반적으로 말하는 물건을 의미하며 여기서 물건은 단순한
데이터가 아니고 그 데이터의 조작 방법에 대한 정보 또한 포함하고
있어 그것을 대상으로 다루는 수법을 객체지향이라고 한다.
3. 사용자 정의 함수
: 정해진 특정한 기능을 수행하는 모듈을 의미하며 함수를 적절히
활용하면 하나의 문제를 잘게 분해할 수 있다. 예를 들어
이진탐색 트리는 삽입,삭제,순회 등 다양한 함수의 집합으로
구성된다. 만약 사용자 정의 함수가 없다면 오직 메인 함수에서
모든 알고리즘을 처리해야 하는데 이는 작업의 효율성을 저하시킴
또한 함수는 각각의 모듈로서 쉽게 수정되고 보완될수있다는 장점
4.사용자정의함수-만들어보기
: 3개의 수 최대 공약수를 프로그램작성
public class Main {
//3개의 수 최대 공약수를 찾는 프로그램
//함수선언 (반환명,함수명,매개변수 구성됨)
public static int function(int a, int b, int c) {
int min;//가장 작은것
if(a>b)
{
if(b>c)
{
min =c;
}
else
{
min = b;
}
}
else
{
if(a>c)
{
min=c;
}
else
{
min = a;
}
}
for(int i = min; i>0; i--)
{
if(a % i == 0 && b % i == 0 && c% i == 0)
{
return i;
}
}
return -1;
}
public static void main(String[] args) {
System. out.println("(400,300,750)의 최대 공약수" + function(400,300,750));
}
}
: 약수 중 K번째로 작은 수를 찾는 프로그램 작성
public class Main {
public static int function(int number, int k) {
for(int i = 1; i <= number; i++) {
if(number % i == 0) {
k--;
if(k==0) {
return i;
}
}
}
return -1;
}
public static void main(String[] args) {
//main메소드 하나으 ㅣ함수이고...
//메인메소드가 종료되면 프로그램 종료와 같은 의미이기 때문에 반환이 없는 void를 써준다.
//프로그램 시작할때 인자값(String[] args) 쓰는 쓸일 없음
int result = function(3050,10);
if(result == -1 ) {
System. out.println("3050의 10번째 약수는 없습니다");
}
else
{
System. out.println("3050의 10번째 약수는" + result + "입니다");
}
}
}
: 문자열에서 마지막 단어를 반환하는 함수
public class Main {
public static char function(String input) {
//charAt은 몇번째 문자를 뽑아와라 함수
return input.charAt(input.length() - 1);
}
public static void main(String[] args) {
System. out.println("Hello World의 마지막 단어는" + function("Hello World"));
}
}
: max() 를 이용하여 최대값을 저장하는 프로그램
public class Main {
public static int max(int a, int b) {
//a가 b보다 크면 a를 리턴하고 아니면 b를 리턴하라 (사망연산자)
return (a > b) ? a : b;
}
public static int function(int a, int b, int c) {
int result = max(a,b);
result = max(result,c);
return result;
}
public static void main(String[] args) {
System. out.println("(345, 567, 789) 중에서 가장 큰 값은?" + function(345,567,789));
}
}
****************자바기초프로그래밍 강좌11,12강-반복 함수와 재귀 함수
1.반복함수
: 단순히 while 혹은 for문법을 이용하여 특정한 처리를 반복하는 방식으로
문제를 해결하는 함수
2.재귀함수
: 자신의 함수 내부에서 자기 자신을 스스로 호출함으로써 재귀적으로
문제를 해결하는 함수
3.실습 - 반복의 묘미
: 팩토리얼을 재귀 함수로 구현할 수 있다.
public class Main {
// 5! = 5 * 4 * 3 * 2 * 1 = 120
// 6! = 720
// 순식간에 값이 엄청 커지는것을 팩토리얼이라고 한다.
public static int factorial(int number) {
//재귀함수 방법2
int sum = 1;
for(int i = 2; i <= number; i++) {
sum *= i;
}
return sum;
}
public static void main(String[] args) {
System. out.println("10의 팩토리얼은 " + factorial(4) );
}
}
: 팩토리얼을 반복 함수로 구현할 수 있다.
public class Main {
// 5! = 5 * 4 * 3 * 2 * 1 = 120
// 6! = 720
// 순식간에 값이 엄청 커지는것을 팩토리얼이라고 한다.
public static int factorial(int number) {
//재귀함수 방법1
if (number == 1)
return 1;
else
return number * factorial(number-1);//5 * 4 * 3 * 2 * 1 = 120
}
public static void main(String[] args) {
System. out.println("10의 팩토리얼은 " + factorial(4) );
}
}
: 피보나치 수열을 재귀 함수로 구현할 수 있다.
: 피보나치 수열을 반복 함수로 구현할 수 있다.
public class Main {
//재귀함수 구현
public static int fibonacci(int number) {
if (number == 1) {
return 1;
}
else if (number == 2) {
return 1;
}
else
{
return fibonacci(number -1) + fibonacci(number - 2);
}
}
/*
//피보나치 : 두개의 수를 하나의 수로 합치는것
//1-1-2-3-5=8 계산된값에 계속 다음값을 더해주는거
public static int fibonacci(int number) {
int one =1;
int two =1;
int result = -1;
if (number == 1) {
return one;
}
else if (number == 2)
{
return two;
}
else
{
for (int i = 2; i < number; i++) {
result = one + two;
one = two;
two = result;
}
}
return result;
}
*/
public static void main(String[] args) {
System. out.println("피보나치 수열의 10번째 원소는 " + fibonacci(10));
}
}
********************자바기초프로그래밍 강좌13강 - 배열
1.배열 선언
: int[] array = new int[100];
//import java.util.Scanner;
public class Main {
//public static int max(int a, int b) {
// return (a > b) ? a : b;
//}
public static void main(String[] args) {
int[] array = new int[100];
for(int i = 0; i < 100; i++) {
array[i] = (int) (Math.random() * 100 + 1); //1~100 랜덤숫자 추출
}
int sum = 0;
for(int i = 0; i < 100; i++) {
sum += array[i];
}
System. out.println("100개의 랜덤 정수의 평균 값은 " + sum / 100 + "입니다"+sum);
/*
Scanner scanner = new Scanner(System.in);
System. out.print("생성할 배열의 크기는 입력하세요 : ");
int number = scanner.nextInt();//사용자입력받은 숫자
int[] array = new int[number];
for (int i = 0; i < number; i++)
{
System. out.print("배열에 입력할 정수를 하나씩 입력하세요(양수) : ");
array[i] = scanner.nextInt();
}
int result = -1;
for (int i = 0; i < number; i++)
{
result = max(result, array[i]);
}
System. out.println("입력한 모든 정수 중에서 가장 큰 값은 :" + result +"입니다.");
*/
}
}
********************자바기초프로그래밍 강좌14강 - 다차원배열
1.다차원 배열은 배열이 배열의 원소로 들어가는 구조로 말함.
흔히 이차원 배열은 MXN형태의 지도를 나타내고자 할 때 많이
사용됨.이러한 다차원 배열을 적절하게 활용하게 되면 현실
세계의 다양한 문제에 보다 쉽게 접근할수있다.
2.실습
:다차원 배열을 학습하고 이를 적용하여 프로그램 작성
:10 * 10의 정수 랜덤 데이터를 생성하여 전체데이터를 분석
public class Main {
public static void main(String[] args) {
int N = 50;
int[][] array = new int[N][N];
for(int i = 0; i < N; i++)
{
for(int j= 0; j < N; j++)
{
array[i][j] = (int)(Math.random() = 10);
}
}
for(int i = 0; i < N; i++)
{
for(int j=0; j < N; j++
{
System. out.print(array[i][j] + " ");
}
System. out.println();
}
}
}
********************자바기초프로그래밍 강좌15강 - 클래스
1.클래스는 객체 지향 프로그래밍에 있어서
가장 기본이 되는 것입니다. 클래스를 이용하여 현실
세계의 특정한 물건을 지칭할 수 있다.
가장 대표적으로 많이 사용되는 것이 Node클래스이다.
이는 하나의 장소나 위치를 의미할 수도 있으며
자료구조에서 말하는 이진 탐색 트리의 하나의 서브
트리가 될 수도 있다. 또한 개발프로젝트에서는 종종
Student 클래스와 같이 하나의 처리할 데이터 단위를
명시하는데 사용이 됨.
2.실습
:하나의 점을 의미하는 Node 클래스를 생성
:Node클래스를 이용하여 두 점 사이에 중점을 구함
Main클래스-------------------------------
public class Main {
public static void main(String[] args) {
Node one = new Node(10,20);
Node two = new Node(30,40);
Node result = one.getCender(two);
System.out.println("x : " + result.getx()+
"Y : " + result.getY());
}
}
Node클래스-------------------------------
public class Node {
private int x;
private int Y;
public int getX() {
return x;
}
public void setX(int x) {
this.x = x;
}
public void setY(int Y) {
this.Y = Y;
}
public Node(int x, int y) {
this.x = x;
this.y = y;
}
public Node getCenter(Node other) {
return new Node(this.x + other.getx() /2,
(this.y+ other.getY())/2);
}
}
********************자바기초프로그래밍 강좌16,17강 - 상속
1. 상속이란?
: 쉽게 말해서 다른 클래스가 가지고 있는 정보를 자신이 포함하겠다는 의미.
즉. 다른 클래스에 대한 정보를 상복받아 자신이 그대로 사용할 수 있도록 함.
상속을 적절히 활용할 때 불필요한 코드의 수를 줄일 수 있어서 상당히 효율적인
개발이 이루어질 수 있다.
2. 상속 - 클래스간의 상호작용 : 실습
: 하나의 사람을 의미하는 Person 클래스를 생성
Person 생성------------------------------------------------------
public class Person {
privat string name;
private int age;
private int height;
private int weight;
// ---각 선언된 변수들의 Get , Set 클래스가 자동 생성됨.
//1. 마우스 오른쪽 -> Source -> Generate Getters and Setters... 클릭
// 2. 창뜨면 Select All 클릭 후 -> OK 클릭
public String getName() {
return name;
}
public void setName(String name) {
this.name = name;
}
public String getAge() {
return Age
}
public void setAge(String name) {
this.name = Age
}
public String getheight;() {
return height;
}
public void setheight;(String name) {
this.name = height;
}
public String getweight;() {
return weight;
}
public void setweight;(String name) {
this.name = weight;
}
//---각 변수들의 생성자를 모두 생성해준다.
// 마우스 오른쪽 -> Source ->Generate Constructor using Fields... 클릭
// 창뜨면 select All 클릭 후 -> OK 클릭
public Person(String name, int age, int height, int weight) {
super(); //자신의 부모클래스에 생성자를 실행하겠다라는것
this.name =name;
this.age = age;
this.height = height;
this.weight = weight;
}
}
Student 생성------------------------------------------------------
public class Student extends Person { //extends 클래스명 <<상속을 하겠다.
private String studentID;
private int grade;
private double GPA;
public String getstudentID() {
return studentID;
}
public void setstudentID(String name) {
this.name = studentID;
}
public String getgrade() {
return grade;
}
public void setgrade(String name) {
this.name = grade;
}
public String getGPA() {
return GPA;
}
public void setGPA(String name) {
this.name = GPA;
}
public Student(String name, int age, int height, int weight,
String studentID,int grade, double gPA) {
//자신의 부모클래스에 생성자를 실행하겠다라는것
super(name,age,height,weight);
this.studentID =studentID;
this.grade = grade;
this.height = height;
this.gPA = gPA;
}
public void show() {
System. out.println("-----------------------------------------------------------");
System. out.println("학생이름:" + getName() );
System. out.println("학생나이:" + getAge() );
System. out.println("학생키:" + getHeight() );
System. out.println("학생몸무게:" + getWeight() );
System. out.println("학번:" + getStudentID() );
System. out.println("학년:" + getGrade() );
System. out.println("학점:" + getGPA() );
}
}
Teacher 클래스 생성------------------------------------------------------
public class Teacher extends person {
private String teacherID;
private int monthSalary;
private int workedYear;
public String getteacherID() {
return teacherID;
}
public void setteacherID(string teacherID) {
this.teacherID = teacherID;
}
public String getmonthSalary() {
return monthSalary;
}
public void setmonthSalary(int monthSalary) {
this.monthSalary = monthSalary;
}
public String getworkedYear() {
return workedYear;
}
public void setworkedYear(int workedYear) {
this.workedYear = workedYear;
}
public Teacher(String name, int age, int height, int weight,
String teacherID,int monthSalary, int workedYear) {
//자신의 부모클래스에 생성자를 실행하겠다라는것
super(name,age,height,weight);
this.teacherID =teacherID;
this.monthSalary = monthSalary;
this.workedYear = workedYear;
}
public void show() {
System. out.println("-----------------------------------------------------------");
System. out.println("교사 이름:" + getName() );
System. out.println("교사 나이:" + getAge() );
System. out.println("교사 키:" + getHeight() );
System. out.println("교사 몸무게:" + getWeight() );
System. out.println("교직원 번호:" + getTeacherID() );
System. out.println("교사 월급:" + getMonthSalary() );
System. out.println("교사 연차:" + getWorked() );
}
}
//다른 프로젝트 클래스를 컨트롤+C에서 붙여넣기 하면 복사 가능
Main 클래스 생성------------------------------------------------------
public class Mina {
public static void main(String[] args) {
Student student1 = new Student("홍길동,20,175,70,
"20170101",1,4.5);
student1.show();
//배열로 구성
student[] students = new Student[100];
for(int i = 0; i < 100; i++) {
students[i] = new Student("홍길동,20,175,70,
"20170101",1,4.5);
students[i].Show();
}
Teacher teacher1 = new Teacher("John Doe",25,180,120,
"ABC201",30000,5);
teacher1.show();
//사용자안테 입력 받음으로 변경
Scanner scan = new Scanner(System.in);
System. out.print("총 몇 명의 학생이 존재합니까?");
int number = scan.nextInt();
Student[] students = new Student[number];
for(int i = 0; i < number; i++) {
String name;
int age;
int height;
int weight;
String studentID;
int grade;
double gPA;
System. out.print("학생의 이름을 입력하세요 : ");
age = scan.nextInt();
System. out.print("학생의 나이을 입력하세요 : ");
height = scan.nextInt();
System. out.print("학생의 키을 입력하세요 : ");
weight = scan.nextInt();
System. out.print("학생의 몸무게을 입력하세요 : ");
studentID = scan.next();
System. out.print("학생의 학번을 입력하세요 : ");
grade = scan.nextInt();
System. out.print("학생의 학점을 입력하세요 : ");
gPA = scan.nextDouble();
students[i] = new Student(name, age, height, weight,
studentID, grade, gPA ) ;
}
for(int i =0; i < number; i++) {
students[i].show();
}
}
}
: Person을 상속받아 하나의 학생을 의ㅏ미하는 Student 클래스를 의미
: Student 클래스를 이용하여 객체를 생성
********************자바기초프로그래밍 강좌18강 - 추상
1.자바 객체지향의 활용
:자바에서의 객체지향을 본격적으로 활용하기 위해서는 자바의 객체지향
개념을 더욱 더 깊게 이해하고 적용할 필요가 있다.
자바에서는 C언어나 여타 원시적인 프로그래밍 언어에서는 제공하지 않았던
특수한 기능들을 제공한다. 대표적으로
추상(Abstract)의 개념이 있으며 그와 비슷하지만 조금 다른 개념인
인터페이스(Interface)의 개념이 존재한다. 자바에서 이러한 다양한
설계 기법들을 제공하기 때문에 개발 자체에서의 안정성과 및 확장 가능성을
보장받을 수 있게 된다. 이번 시간에는 이러한 다양한 객체 지향 기법의 활용에
대한 내용을 공부하게 된다.
※ 객체지향 : 객체는 일반적으로 말하는 물건을 의미하며 여기서 물건은 단순한
데이터가 아니고 그 데이터의 조작 방법에 대한 정보 또한 포함하고 있어
그것을 대상으로 다루는 수법을 객체지향이라고 한다.
2.추상 - 구체적인게 아닌것이라는것..설계정도했다~
:자바에서는 일종의 미완성의 클래스라고 할 수 있는 추상(Abstract)클래스제공
추상클래스는 직접적으로 객체 인스턴스를 생성할 수 없다. 하지만 새로운
클래스를 작성하는데 밑바탕이 되는 역할을 해준다는 것에서 의미가 있다.
어느 정도 미리 설계로서 틀을 갖추고 클래스를 작성할 수 있게 한다는 기능적인
측면에서 의미가 있다.
3.실습 1
Player 추상클래스 생성------------------------------------------------------
abstract class Player { //abstract라는게 추상을 의미
abstract void play(string songname);
abstract void pause();
abstract void stop();
}
Main 클래스 생성------------------------------------------------------
public class Main extends Player { //Main 마우스 올리고 -> Add unim.클릭
public static void main(String[] args) {
Main main = new Main();
main.play("Joakim Karud - Mighty Love");
main.pause();
main.stop();
}
@Override
void play(string songName) {
System. out.println(songname + " 곡 재생");
}
@Override
void pause() {
System. out.println("일시정지");
}
@Override
void stop() {
System. out.println(" 정지");
)
}
4.실습2
Animal 추상클래스 생성------------------------------------------------------
abstract class Animal {
abstract void crying();
}
Dog 추상클래스 생성------------------------------------------------------
public class Dog extends Animal {
@override
void crying() {
System. out.pringln("왈왈!"
}
}
Cat 추상클래스 생성------------------------------------------------------
public class Cat extends Animal {
@Overrid
void crying() {
System. out.println("야옹");
}
}
Main 클래스 생성------------------------------------------------------
public class Main {
public static void main(String[] args) {
Dog dog = new Dog();
Cat cat = new Cat();
dog.crying();
cat.crying();
}
}
********************자바기초프로그래밍 강좌19강 - 최종(Final)
1.최종(Final) - 최종적으로 규정한다
: 자바에서 절대 변하지 않는 특정한 것을 정하고 싶을 때는
최종(Final)을 사용합니다. 이 키워드는 변수,메소드,클래스에
모두 사용할 수 있다.변수에 사용할 경우 변하지 않는 상수가
되며, 메소드가 사용할 때는 재정의가 불가능한 메소드가 되며,
클래스에 사용할 때는 상속이 불가능한 하나의 완전한 클래스가
되는 것.
: Java Final Keyword
- Stop Value Change
- Stop Method Overridding
- Stop Inheritance
2.실습
: Final 키워드르 사용할 변수를 다룸
: Final 키워드를 사용한 메소드 다룸
: Final 키워드를 사용한 클래스를 다룸
Main 클래스 생성----------------------------------------------
public class Main extends Parent {
//함수에 Final 붙으면 고정됨
//public void Show() {
// System. out.println("Hello!");
//}
public static void main(String[] args) {
//final int number = 10; //상수
//System. out.println(number);
Main main = new Main();
main.Show();
}
}
Parent 클래스 생성--------------------------------------------
public class Parent {
public final void Show() {
System. out.println("Hi!");
}
}
********************자바기초프로그래밍 강좌20강 - 인터페이스
1.인터페이스 - 설계의 본질
: 인터페이스는 얼핏 보기에는 추상(Abstract) 클래스와 매우
흡사한 개념으로 느껴질 수 있다. 인터페이스는 숙력된 자바
개발자들에게 아주 선호되는 설계 기능이면서 자바에서 다중
상속을 구현하게 해주는 고급 기술이기도 한다. 추상클래스는
추상 메소드 외에 멤버변수나 일반 메소드를 가질 수 있지만
인터페이스에서는 반드시 사전에 정의된 추상 메소드와
상수만을 가질 수 있다는 특징이 있다.
인터페이스는 팀 프로젝트의 동시 작업에 유리하고 일반적으로
추상보다 요구되는 설계의 기준이 높아서 더 체계적이라는
평을 받는다.
2.실습
: 인터페이스를 선언하고 메소드를 다루어봄
: 인터페이스의 다중 상속에 대한 학습
Main 클래스 생성--------------------------------------------
public class Main implements Dog,Cat {
public static void main(String[] args) {
Main main = new Main();
main.crying();
//main.show();
main.one();
main.two();
}
@Override
public void crying() {
System. out.println("왈!왈");
}
@Override
public void two() {
System. out.println("원");
}
@Override
public void one() {
System. out.println("투");
}
}
Dog 클래스 생성--------------------------------------------
/*
abstract class Dog {
abstract void crying();
//public void show() {
// System. out.println("HelloWorld")
//}
}
*/
public interface Dog {
abstract void crying();
abstract void one();
//public void show();
//public void show() {
//인터페이스 속에는 정해진 코드는 넣을수 없다. 추상메소드랑 틀림
//}
}
Cat 클래스 생성--------------------------------------------
public interface Cat {
abstract void crying();
abstract void two();
}
********************자바기초프로그래밍 강좌21강 - 다형성
1.다형성 - 다양한 동작
: 다형성은 기본적으로 다양한 형태의 성질을 가진다는 의미를
가지고 있다.기본적으로 자바는 다형성을 그 특징으로 가지는
객체 지향 프로그래밍 언어이며, 자바에서는 이 다형성을
이용하여 객체를 사용할 때 사용하는 변수 형태를 바꾸어
여러 타입의 객체를 참조할 수 있다. 결과적으로 이러한
다형성의 개념을 적절하게 이용할 때 프로그램의 소스 코드를
유연하게 구성할 수 있습니다. 다형성은 부모 클래스 타입의
참조 변수로 하위 클래스의 객체를 참조할 수 있게 해줌
2.실습
: 과일 정보 프로젝트를 구현
Main 클래스 생성--------------------------------------------
import java.util.Scanner;
public class Main {
public static void main(String[] args) {
Scanner scanner = new Scanner(System.in);//입력받기
System.out.println("바나나 : 1, 복숭아 : 2?");
int input = scanner.nextInt();
Fruit frult;
if(input ==1) {
frult = new Banana();
frult.show();
}
else if(input ==2) {
frult = new Peach();
frult.show();
}
Fruit fruit = new Banana();
fruit.show();
}
}
Fruit 클래스 생성--------------------------------------------
public class Fruit {
String name;
int price;
int fresh;
public void show() {
System. out.println("이름 :" + name);
System. out.println("가격 :" + price);
System. out.println("신선도 :" + fresh);
}
}
Peach 클래스 생성--------------------------------------------
public class Peach extends Fruit{
public Peach() {
price = 1500;
name = "복숭아";
fresh = 75;
}
}
Banana 클래스 생성--------------------------------------------
public class Banana extends Fruit {
public Banana() {
name = "바나나";
fresh = 50;
price = 1000;
}
}
******************* 자바기초프로그래밍 강좌22강 - Object클래스
1.객체 - 모든 객체의 조상
: 객체(Object) 클래스는 모든 객체의 조상으로써 쓴다.
자바에서 사실 모든 클래스는 암시적으로 Object클래스를 상속
받고 있다. 그러한 이유에서 Object클래스는 모든 클래스의
조상이라고 할 수 있다. 이러한 클래스가 존재하는 이유는
모든 클래스가 공통으로 포함하고 있어야 하는 기능을
제공하기 위함.
2.실습
: 객체를 비교하는 방법을 알아봄
Archer 클래스------------------
public class Archer {
String name;
String power;
public Archer(String name, String power) {
this.name = name;
this.power = power;
}
public boolean euqals(Object obj) {
Archer temp = (Archer) obj;
if(name == temp.name && power == temp.power) {
return true;
}
else
{
return false;
}
}
}
Main 클래스 ----------------------------
public class Main {
public static void main(String[] args) {
Archer archer1 = new Archer("궁수", "상");
Archer archer2 = new Archer("궁수", "상");
//System. out.println(archer1.name );
//System. out.println(archer2.name );
//System.out.println(archer1.power );
//System. out.println(archer2.power );
//System. out.println(archer1 );
//System. out.println(archer2 );
System. out.println(archer1.equals(archer2));
}
}
******************* 자바기초프로그래밍 강좌23강 - 객체지향기법
1.객체지향의 활용 - 실습
: 각 케릭터 상속받아 기능추가
Main 클래스 ----------------------------
public class Main {
public static void main(String[] args) {
Hero[] heros = new Hero[3];
heros[0] = new Warrior("전사");
heros[1] = new Archer("궁수");
heros[2] = new Wizard("마법사");
for(int i = 0; i<heros.length; i++) {
heros[i].attack();
if(heros[i] instanceof Warrior) {
Warrior temp = (Warrior) heros[i];
temp.groundCuttin();
}
else if(heros[i] instanceof Archer) {
Archer temp = (Archer) heros[i];
temp.fireArrow();
}
else if(heros[i] instanceof Wizard) {
Wizard temp = (Wizard) heros[i];
temp.freezing();
}
}
}
}
Warrior 클래스 ----------------------------
public class Warrior extends Hero {
public Warrior(String name) {
super(name); //자기 부모클래스를 가져옴
}
public void groundCuttin() {
System. out.println("대지가르기");
}
}
Wizard 클래스 ----------------------------
public class Wizard extends Hero {
public Wizard(String name) {
super(name);
}
public void freezing() {
System. out.println("얼리기");
}
}
Hero 클래스 ----------------------------
public class Hero {
String name;
public Hero(String name) {
this.name = name;
}
public void attack() {
System. out.println("주먹지르기");
}
}
댓글